| Hangar |
Aircraft |
Category |
Date |
Preview |
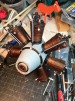
| LASTWOODSMAN | Scratch Built Curtiss Pusher | Parked | 04-Feb-17 12:59 |  | | Views : 771 | | This is the "Deeper Dish" side of the wheel - 8 spokes glued in place - notice the "shorter" shinny spacer sleeve on the bottom of the axle of the wheel jig (left side of pic), which lowers the hub from the wheel rim that is positioned on the jig, in order to get a deeper dish when installing the spokes at a downward angle from the wheel rim. |
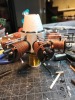
| LASTWOODSMAN | Scratch Built Curtiss Pusher | Parked | 04-Feb-17 12:50 | 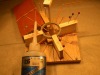 | | Views : 730 | | I used an "extender tip" on the CA glue bottle to place a tiny drop of glue where the tenon spoke tip went into the mortise hole of the hub. It worked at first, then plugged up - anyone know how to keep them from plugging up? |
| LASTWOODSMAN | Scratch Built Curtiss Pusher | Parked | 04-Feb-17 12:46 | 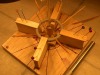 | | Views : 729 | | Here is that tool (upper right - shiny pin at the tip of a toothpic) making a pin hole into the balsa hub. Then I pushed the long sharp point, of a stained finished toothpic spoke, through the felloe hole of the wheel rim, and into the starter pin hole in the hub, twisting and spinning the spoke into the hub pin hole. I then removed the spoke and cut a little bit off of the pointy tip of the toothpic spoke, stuck it back in, pushed it into the enlarged hub hole, and spinned it nice and tight, and glued the rim felloe hole with the toothpic in it with super thin CA glue. |
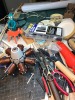
| LASTWOODSMAN | Scratch Built Curtiss Pusher | Parked | 04-Feb-17 12:30 | 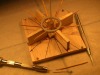 | | Views : 764 | | Checking the allignment of the spokes to the hub attach points. Since the wheel hub was soft balsa, I did not have to actually drill the tiny holes in the hub. I started the mortise holes in the hub with the point of a round head 0.023" dia. pin. I made a little tool to push the pin point into the hub for a starter hole. I cut off the tip of a spare toothpic, drilled a 0.025" hole with a #72 drill bit and pin vise, into the toothpic and cut off a piece of the tip of the round head pin, and CA glued it into the end of the toothpic (tool at bottom of pic). |
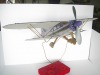
| jgood | Erco Ercoupe 415-E | Flying | 04-Feb-17 10:24 |  | | Views : 5189 | | Did a flight up to Tahoe this week, and a friend took this from his Luscombe. |
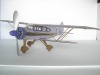
| biplane guy | Guillows Series 800 - Stearman PT-17 | Parked | 04-Feb-17 07:52 |  | | Views : 2202 | | WACO UPF7 |
|
|