| Hangar |
Aircraft |
Category |
Date |
Preview |
| Huey V77 | Scratch Built Gee Bee Model "Y" | Parked | 13-Feb-17 13:59 | 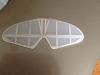 | | Views : 790 | | Attached with 70% thinned. |
| LASTWOODSMAN | Aero-Werkes AW 11607 - Pfalz Dr.I Triplane | Parked | 13-Feb-17 11:58 | 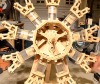 | | Views : 4547 | | Ian Jimmerson explains how a Radial Engine uses a Cam Ring Plate with "lobes" on it, to move the "lifter rollers" that are attached to the bottoms of the push rods, which then go up and down, to open and close the intake and exhaust valves at the tops of each cylinder (as opposed to a Car engine which uses a Camshaft with lobes) http://fireaviation.com/2016/01/23/carpenter-builds-wood-model-of-9-cylinder-radial-engine/ Part 1 - 10 min - Part 2 -9 min video |
| LASTWOODSMAN | Aero-Werkes AW 11607 - Pfalz Dr.I Triplane | Parked | 13-Feb-17 11:51 | 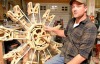 | | Views : 6623 | | HOW A RADIAL ENGINE WORKS Carpenter Ian Jimmerson has built a huge working model of a 9 cylinder Radial Engine, out of wood with clear plastic tubes on the cylinders, so you can see them go up and down, and carefully explains how all of the parts work together, and he turn the crankshaft slowly by hand so you can see everything moving. This guy should be ( maybe he already is) a teacher. Here is the video link http://fireaviation.com/2016/01/23/carpenter-builds-wood-model-of-9-cylinder-radial-engine/ Part 1 - 10 min video and Part 2 - 9 min video. Now I know how the Radial Engine works!! |
| Huey V77 | Scratch Built Gee Bee Model "Y" | Parked | 11-Feb-17 19:19 | 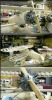 | | Views : 909 | | John, my friend is building a F11C2, 84". Maybe Gumbe would like to check out this engine? |
| Huey V77 | Scratch Built Gee Bee Model "Y" | Parked | 11-Feb-17 19:12 | 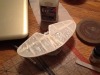 | | Views : 801 | | Was reading about Ezedope, thought I'd try it. I don't know what its made from but its strange stuff. Used dope techniques, seems to work. At least the nitrate peals off your fingers, this stuff doesn't. |
| John M Oshust | ManzanoLaser BAT FK-24 Baboon | Build | 11-Feb-17 13:19 | 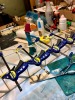 | | Views : 862 | | I convinced Gumby to stay home and toil. |
|
| Hangar |
Aircraft |
Category |
Date |
Preview |
| John M Oshust | ManzanoLaser BAT FK-24 Baboon | Build | 11-Feb-17 13:18 |  | | Views : 813 | | Gluing and squaring... progress! |
| LASTWOODSMAN | Scratch Built Curtiss Pusher | Parked | 10-Feb-17 20:39 | 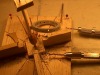 | | Views : 10859 | | The wheel rim is ready for the spokes and the hub ... first a little "Dremelling" sanding to round out the edges. |
| LASTWOODSMAN | Scratch Built Curtiss Pusher | Parked | 10-Feb-17 20:35 |  | | Views : 6968 | | SUCCESS - it worked - "Mandrake" and "Bloodroot" hold up the new perfectly drilled wheel rim in Victory, before beaming back to the future in their "captured Mig 17". |
| LASTWOODSMAN | Scratch Built Curtiss Pusher | Parked | 10-Feb-17 20:28 | 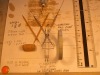 | | Views : 6440 | | DRAFTSMAN DIAGRAM - I should have made this diagram at the start. This shows the correct hole locations, to "awl", open a bit with a 1/32" drill bit, then five more drilling operations, with a pin vise, all on each felloe hole to enlarge it to a 3/32" wheel rim hole. My fingers were getting pretty sore from all of that pin-vise drilling by hand! |
| LASTWOODSMAN | Scratch Built Curtiss Pusher | Parked | 10-Feb-17 20:19 | 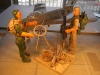 | | Views : 6393 | | "Mandrake" and "Bloodroot" Cyborg Soldier Engineering Consultants beamed in from the future in their "captured Mig 17", to assess the situation and offer assistance and analysis. Their "CONCLUSION" -the drill bits did not "wander" or "walk" away from the "awl-made" starter location holes. The starter holes were made in the wrong locations. "RECOMMENDATION" - go "BACK TO THE DRAWING BOARD" and draw it all out in full size and start all over again. |
| LASTWOODSMAN | Scratch Built Curtiss Pusher | Parked | 10-Feb-17 20:12 |  | | Views : 7530 | | 1 5/8" Wooden Spoke Wheel - another dismal FAILURE on the 4th attempt - I'm batting 2 for 4 now. The spoke "falloe" holes, drilled through the wheel rim, ended up coming out through the flat sided walls of the rim, instead of coming through the concave, curved, flat inside of the wheel rim. I tried to chalk it up to "walking" and "wandering" of the drill bits, of the five drill bit operations, of increasing drill bit size, to enlarge each hole to 3/32" diameter. But I knew I was wrong, and I sent a telepathic message for help. |
|
